The Evolution of Cel-Shading: A Detailed Exploration of the History, Techniques and Applications
Introduction
Cel-shading, or toon shading within creative media, is a rendering concept applied in computer graphics to give a flat, two-dimensional appearance to virtual 3D assets. The goal is to imitate the look of hand-drawn traditional animation, in which a scene’s complexities of Physically based rendering are removed, represented instead by the core information required to convey the original intent. The basic principle of cel-shading is to average a scene’s lighting and colour information, by reducing it down into a simplified body of discrete “cels”, that represent the former data in a condensed format. As these cels border, it creates a stark contrast between light and shadow, creating an effect of comic-style illustration.
Following standard techniques with game engines, cels are instantiated from the lighting of a diffuse model, traditionally Lambertian Reflectance; calculated as the dot product of the surface normal vector, and the inverse of the light direction vector. The inverse of the light direction is used to ensure that the sign of the values is ordered correctly, otherwise, the lighting would be reversed with the shadow side facing the light source. This model for lighting functions, as the outcome of the two vectors, equals 1 or -1 when they are parallel depending on the sign of the vectors as scalar multiples, and 0 when they are perpendicular. This value determines the brightness of the surface, -1 to 0 being in shadow and 0 to 1 being illuminated.
Lambertian Reflectance Model for Diffuse Lighting
float4 CalculateDiffuseLighting(float3 normal, float3 lightDir)
{
    float NdotL = max(dot(normal, -lightDir), 0.0);
    return float4(NdotL, NdotL, NdotL, 1.0); // Return grayscale value for lighting
}
At the moment, we’ve only determined the diffuse lighting where brightness is an even gradient from -1 to 1. To reveal the cels that we’re after, we could use several methods to achieve similar outcomes, but they all invariably rely on the same basic principles. Thresholds are set to squeeze values together, the most basic example being all values below 0 being set to -1 and all values above being set to 1, resulting in single-step shading with only shadow and light being represented. However, this doesn’t have to be limited to one step; depending on where along the imaginary number line of -1 to 1 you decide to set thresholds, multiple steps can be created. This gives precise control of where shading boundaries exist and allows for many different styles to be achieved depending on how you define the lighting.
Basic Cel Shading with Hard and Multi Thresholds
float4 ApplyThreshold(float4 diffuse, float threshold)
{
    float brightness = diffuse.r; // Assuming a grayscale input for brightness
    // Apply threshold
    if(brightness < threshold)
        brightness = 0.0; // Shadow
    else
        brightness = 1.0; // Light

    return float4(brightness, brightness, brightness, diffuse.a);
}

float4 ApplyMultiStepThreshold(float4 diffuse, float2 thresholds)
{
    float brightness = diffuse.r;
    // Define three levels: shadow, mid-tone, and light
    if(brightness < thresholds.x)
        brightness = 0.33; // Shadow
    else if(brightness < thresholds.y)
        brightness = 0.66; // Mid-tone
    else
        brightness = 1.0; // Light

    return float4(brightness, brightness, brightness, diffuse.a);
}
My preferred method for implementing these thresholds lies within textures, made more popular by modern visual node-shader tools such as Unity’s Shadergraph. A “ramp texture” is a 1D gradient texture that maps an input scalar value to an output colour value. The texture is sampled along its single axis, based on the Lambertian lighting input to define the transition between lit and shadowed areas of an object. This allows finer control over the placement of shadow bands, their size, their strength, and how harsh the shading is between each band, in an easier-to-visualise format. With modern engine tools, including built-in gradient editor functions, it’s easy to see, removed from the context of specific assets, how the lighting is applied.
Ramp Texture for Cel Shading
Texture1D _RampTexture;
sampler _RampSampler = sampler_state{Texture = <_RampTexture>;};

float4 SampleRampTexture(float4 diffuse)
{
    float brightness = diffuse.r; // Use red channel for grayscale brightness
    float rampValue = tex1D(_RampSampler, brightness).r; // Sample the ramp texture
    return float4(rampValue, rampValue, rampValue, 1.0); // Return as grayscale
}
This simple concept can be applied to every aspect of lighting within PBR principles depending on how “realistic” the desired outcome has to be. Often mixing and matching elements of realism within cel-shading can make it feel more grounded to audiences, as optical phenomena people are used to seeing can reinforce their immersion. For instance, while the shadows in a cel-shaded scene might be presented in stark, crisp steps to mimic the style of a comic illustration, reflections and refractions of light can be rendered in a more conventional manner to add a sense of depth and realism. Including more lifelike elements such as light bounce, subsurface scattering and ambient occlusion helps bridge the gap between a flat, two-dimensional aesthetic and the familiar, tangible quality of the real world. This can be most commonly seen in modern films by studios such as Disney, Pixar and Dreamworks, all of which leverage these concepts in their feature animated films.
At its core, cel-shading is about abstracting the complex, continuous nuances of real-world light and shadow into a discrete, easily readable set of visual cues. Its simple aesthetic is deceptive, though, as achieving a compelling, balanced cel-shaded scene requires a keen understanding of both art and technology. While cel-shading can often be seen as a ‘stylised’ choice, it is nonetheless as nuanced and complex as any other rendering method in its own right. Cel-shading continues to be a compelling choice for artists and creators looking to strike a balance between two-dimensional artistry and three-dimensional realism. As technology evolves and the boundaries of visual rendering continue to be pushed, it will be exciting to see where cel-shading might venture next, and what new possibilities it might bring to the world of digital art and storytelling.
Complete Shader Snippet
// Inputs and samplers
Texture1D _RampTexture;
sampler _RampSampler = sampler_state{Texture = <_RampTexture>;};
float4 _LightDir; // Should be set to the inverse of light direction

// Vertex to fragment shader structure
struct v2f
{
    float3 normal : NORMAL;
    float4 pos : SV_POSITION;
};

// Vertex shader
v2f vert(appdata_full v)
{
    v2f o;
    o.pos = UnityObjectToClipPos(v.vertex);
    o.normal = v.normal;
    return o;
}

// Fragment shader
float4 frag(v2f i) : SV_Target
{
    // Calculate Lambertian reflectance
    float NdotL = max(dot(i.normal, _LightDir.xyz), 0.0);

    // Sample the ramp texture to apply cel shading
    float rampValue = tex1D(_RampSampler, NdotL).r;

    // Output the shaded color
    return float4(rampValue, rampValue, rampValue, 1.0);
}

History of Cel-Shading
Cel animation, also known as celluloid animation, is a traditional animation technique that involves creating and manipulating individual drawings on transparent celluloid sheets. This technique was first developed in the early 20th century and was widely used in the animation industry until the advent of computer animation in the late 20th century, and is the origin from which the term cel-shading is derived. It involves layering multiple cels of the characters and backgrounds which are then shot on a camera. This creates one frame, and once enough frames are accumulated they are then cycled through, like a super advanced flipbook, to create the final animation.
In the late 1930s Cel animation was first publicly acknowledged when Disney used the technique in its animated films. Prior to that, the studio had primarily used a different animation technique known as the multiplane camera, which involved animating on multiple layers of glass. However, this technique was expensive and time-consuming. In the early 1930s, the studio began experimenting with cel animation, a technique in which individual drawings are created on transparent celluloid sheets or cels. This technique was cheaper and more efficient than the multiplane camera technique, and it allowed for more detailed and realistic animation. Disney’s first full-length animated feature film, “Snow White and the Seven Dwarfs” (1937), was created using the cel animation technique. The film was a huge success and established Disney as a leader in the animation industry. Disney continued to develop and refine the cel animation technique over the following years. In 1940, Disney Studios released its second feature film, “Pinocchio,” which featured even more advanced animation than “Snow White.” The studio also introduced the concept of “limited animation,” which involved using fewer drawings per second to save time and money. Disney’s cel animation technique was widely adopted by other animation studios, becoming the standard for animated films for many years.
The history of anime, or Japanese animation, can be traced back to the early 20th century. In 1917, animator Shimokawa Oten created the first animated film in Japan, which was a short film called “Imokawa Mukuzo Genkanban no Maki.” However, it was not until the 1960s, after the huge strides of Disney in pioneering cel animation, that anime began to gain widespread popularity in Japan and eventually around the world. One of the key factors that contributed to the popularization of anime was the development of television animation in Japan. In the 1960s, the first anime television series, “Astro Boy,” was created by Osamu Tezuka and aired on Japanese television. The series was a huge success and helped to establish anime as a viable medium for storytelling and entertainment. Another important factor that contributed to the popularization of anime was the introduction of anime to international audiences. In the 1970s, anime began to be exported to other countries, starting with the United States. This was largely due to the efforts of American anime fans who formed anime clubs and began to import and distribute anime in the US. One of the reasons for this was that anime began to explore more mature themes and content compared to traditional Disney animation.
One of the first examples of anime that explored adult themes was “Akira” (1988), directed by Katsuhiro Otomo. The film dealt with themes of social and political commentary, cyberpunk, and violence. It was a commercial and critical success and it helped to establish anime as a medium that could handle more mature and complex topics. Another anime that helped to popularize anime with adult themes was “Neon Genesis Evangelion” (1995). The show explored mature themes such as psychological trauma, religious symbolism, and sexuality. It was a commercial success and was highly regarded by both critics and audiences. Additionally, anime has been able to explore more mature themes due to the lack of censorship laws compared to traditional Disney animation which is targeted to a specific age group and subject to censorship laws. This freedom has allowed anime creators to tackle more sensitive and controversial subjects that would not be allowed in traditional Disney animation. Overall the success of cult hits such as “Akira” and “Nausicaä of the Valley of the Wind,” which were widely acclaimed for their visually striking animation and compelling storytelling, helped to keep the medium relevant as entertainment moved into the digital era and establish anime as a global cultural phenomenon.
The origins of cel-shading can be traced back to the early days of animation, a simple style that emphasizes striking character designs, emotive expressions, and stylized vibrant visuals. As a rendering technique, cel-shading was first introduced in the late 1990s, as a way to create 3D models and environments that mimicked the look of hand-drawn cels of the past. Characterised by bold lines, bright colours, and a distinct lack of fine details makes it well-suited to cel-shaded rendering. Additionally, anime’s focus on storytelling and character development, rather than photorealism, made it easier for animation and game studios to adopt cel-shading as a cost-effective and efficient way to create 3D entertainment. One of the first examples of cel-shading in animation was the 1992 film “Bugs Bunny: Rabbit Rampage,” which used the technique to create a more cartoon-like appearance for the characters.
In the late 1990s, cel-shading began to be used in video games, with the first examples appearing in games like “Jet Grind Radio” for the Dreamcast in 2000, “Tales of Phantasia” for the PlayStation in 1998 and “The Legend of Zelda: The Wind Waker” for the GameCube in 2002. These early games used cel-shading to create a more stylized and cartoon-like appearance for the characters and environments, and the technique quickly became popular in the gaming industry. These early examples of cel-shaded games used a limited palette of colours and sharp edges to give the appearance of hand-drawn animation. The technique was used to create a more stylized and cartoon-like look that was distinct from the more realistic graphics that were common in other 3D games at the time.
In the following years, cel shading became more popular in video games, with several more games using the technique, such as “Viewtiful Joe” (2003) for the GameCube and PlayStation 2, “Okami” (2006) for the PlayStation 2 and “Borderlands” (2009) for Xbox 360, PlayStation 3 and PC. In recent years, with the advancement of technology, cel-shading has become more sophisticated and realistic, but still maintains a stylized and cartoon-like look. Games such as “Ni No Kuni: Wrath of the White Witch” (2013) and “The Legend of Zelda: Breath of the Wild” (2017) maintain that traditional cel-shaded look while utilizing modern lighting techniques, visual effects and high-definition texturing.
Advanced Cel-Shading Techniques
Half-Tone
The half-tone effect is a technique used to give a classic, pop comic book-like appearance to shadows. It works by breaking down the shading of an object into a series of dots of varying sizes and darkness, simulating the look of traditional half-tone printing. To implement this effect, you can use a threshold function that maps the shading of the object to an arrangement of dots created using Voronoi noise. The threshold value can be determined by the surface normal of the object, its surface colour, or a custom lighting calculation. By adjusting the threshold and dot size, you can achieve a range of different styles, from bold and graphic to more subtle and nuanced.
// Assuming we have a function to generate Voronoi noise.
// The function 'Voronoi' should return a value based on the input UVs that mimics the Voronoi pattern.

float4 CalcHalfTone(float2 uv, float3 normal, float4 color)
{
    float shade = dot(normal, _WorldSpaceLightPos0.xyz); // Simple diffuse shading
    shade = saturate(shade); // Keep it in [0,1] range

    float pattern = Voronoi(uv); // Your Voronoi noise function

    // Apply the halftone pattern based on the shade
    return shade < pattern ? float4(0, 0, 0, 1) : color;
}
Cross-hatching
Cross-hatching is a technique used in cel-shading to achieve a hand-shaded look to shadows. It involves creating a texture map of intersecting lines that are evenly spaced and vary in intensity and thickness, meant to mimic the pencil marks of shading in a traditional illustration. The lines are added to the surface of the 3D model in a perpendicular pattern to define shading and depth, making the object appear 2D and flat. The denser the lines, the darker the shading will be, and the thicker the lines, the greater the depth perception. The cross-hatching lines in the lighted areas will be lighter, while those in the shadowed areas will be darker.
// Cross-hatching texture with transparency where the lines are
sampler2D _CrossHatchTex;
float _CrossHatchThreshold;

float4 CalcCrossHatching(float2 uv, float3 normal, float4 color)
{
    float luminance = dot(normalize(normal), _WorldSpaceLightPos0.xyz);
    luminance = saturate(luminance); // Keep it in [0,1] range

    // Sample the cross-hatching texture
    float4 hatch = tex2D(_CrossHatchTex, uv);

    // Apply the cross-hatching effect based on light intensity
    return lerp(hatch * color, color, step(_CrossHatchThreshold, luminance));
}
Rim Lighting
Rim lighting, also known as backlighting or edge lighting, is a visual effect used in computer graphics and video games to add depth and enhance the overall look of an object. In cel-shading, rim lighting is a common technique used to create a cartoon-like appearance by separating the object from the background. First, you calculate the angle between the surface normal of the object and the light source. If the angle is greater than a certain threshold, fresnel shading is used to create the highlight. This calculates the reflection of light on the surface of the object, taking into account the angle between the surface normal and the view direction. The brighter the reflection, the brighter the highlight. The rim light can be further modified by adjusting the brightness and colour of the light source, as well as the intensity and size of the rim light effect.
// Rim lighting properties
float _RimPower;
float4 _RimColor;

float4 CalcRimLighting(float3 normal, float3 viewDir)
{
    float rim = 1.0 - saturate(dot(normal, viewDir)); // Fresnel equation
    rim = pow(rim, _RimPower); // Control the falloff

    return _RimColor * rim; // Apply the rim color
}
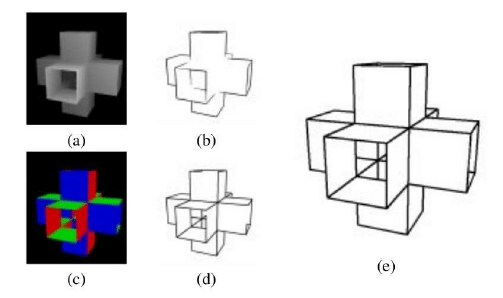
Hull Outlines
This technique is used to generate an outline around objects in 3D graphics. It works by creating a convex hull around an object’s silhouette and extruding it to create a thick outline. The convex hull is created by adding additional vertices to the silhouette until all the internal angles are less than 180 degrees. The resulting shape is then rendered using a stroke width to create a visible outline.
// This effect is usually done in the vertex shader by extruding vertices along their normals.
// Here's a conceptual snippet:

v2f vert(appdata_base v)
{
    v2f o;
    float3 extrudedPosition = v.vertex.xyz + (v.normal * _OutlineWidth);
    o.pos = UnityObjectToClipPos(extrudedPosition);
    return o;
}

// In the fragment shader, you would typically return a solid color.
Sobel Edge Detection (Post-Process)
Sobel edge detection is a computer vision technique that is used to identify edges in an image. It works by convolving a Sobel filter over the image to calculate the gradient of the image intensity. The resulting gradient is then thresholded to produce an edge map, which can be used to create an outline effect in real-time graphics. This technique can be implemented as a post-process effect, meaning it is applied after the main 3D scene has been rendered.
// Sobel operator implementation in post-processing effect

sampler2D _MainTex; // Scene texture

float4 CalcSobel(float2 uv)
{
    float2 texelSize = 1.0 / _ScreenParams.xy; // Inverse of screen size
    float Gx = 0;
    float Gy = 0;

    // Apply the Sobel filter
    // The following lines should be adjusted to sample the texture properly using texelSize for offset
    Gx = tex2D(_MainTex, uv + float2(-texelSize.x, -texelSize.y)).r * -1;
    // ... (additional sampling for Sobel)

    Gy = tex2D(_MainTex, uv + float2(-texelSize.x, texelSize.y)).r * -1;
    // ... (additional sampling for Sobel)

    float edge = sqrt(Gx * Gx + Gy * Gy); // Magnitude of gradient
    return edge > _SobelThreshold ? float4(1, 1, 1, 1) : float4(0, 0, 0, 0);
}
Normals Edge Detection
This technique involves computing the normal vectors of an object’s surface and using them to create an outline. Normal vectors point perpendicular to a surface and can be used to determine if two adjacent polygon vertices are facing in opposite directions. By comparing the normals of adjacent polygon vertices, the outline of an object can be generated by rendering a line between vertices with opposing normals. This technique is often used in combination with other techniques, such as Sobel edge detection, to produce a more refined outline.
// Conceptual implementation for normals-based edge detection.

sampler2D _NormalMap; // Normal map
float _EdgeWidth;

float4 CalcNormalEdge(float2 uv)
{
    float2 texelSize = 1.0 / _ScreenParams.xy; // Inverse of screen size
    float3 centralNormal = tex2D(_NormalMap, uv).rgb * 2.0 - 1.0;

    // Compare normals in the neighborhood
    float3 leftNormal = tex2D(_NormalMap, uv - float2(texelSize.x, 0)).rgb * 2.0 - 1.0;
    float3 rightNormal = tex2D(_NormalMap, uv + float2(texelSize.x, 0)).rgb * 2.0 - 1.0;
    // ... (additional samples for a better comparison)

    // Compute an edge strength
    float edgeStrength = saturate(dot(centralNormal, leftNormal)) < _EdgeWidth ? 1.0 : 0.0;
    // Combine the results from all directions for the final edge detection

    return edgeStrength;
}
Dithering
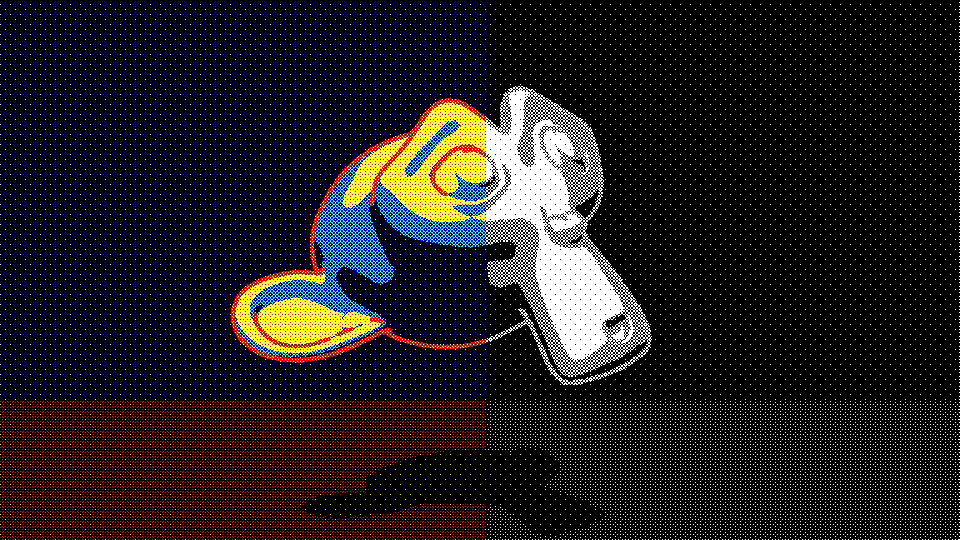
Dithering is a technique used to create the illusion of more colour shades and tones in cel-shading, which mimics the look of hand-drawn comic book illustrations. It involves quantizing the colour palette to a set of predefined shades, shading the objects in the scene, and introducing a dithering pattern by assigning random intensities to the pixels. This creates a textured, mottled effect that simulates the natural variations in tone found in traditional hand-drawn illustrations, adding depth and richness to the scene. There are several different dithering algorithms, including ordered dithering, noise dithering, and error diffusion dithering, that all share the goal of breaking up solid blocks of colour into smaller, random pixels.
// Dithering effect using a pattern and quantizing color

sampler2D _DitherPattern;
float _DitherStrength;
int _ColorLevels;

float4 CalcDithering(float2 uv, float4 color)
{
    // Sample the dither pattern
    float dither = tex2D(_DitherPattern, uv).r;

    // Apply dithering
    float3 quantizedColor = floor(color.rgb * _ColorLevels) / _ColorLevels;
    float3 dithered = lerp(quantizedColor, color.rgb, dither * _DitherStrength);

    return float4(dithered, color.a);
}
Conclusion
Cel shading is a distinctive and versatile style of graphics that has found its way into various forms of media, including video games, movies, and television. This rendering technique gives objects a flat, comic-book-like appearance with crisp outlines and bold colour contrasts, providing a wide range of expression and storytelling possibilities. Over the years, cel shading has become a favourite among animators and audiences, as it offers a unique and captivating style that few other techniques can match.
Thanks to advancements in technology, the world of cel shading continues to evolve, and new lighting techniques such as subsurface scattering and ambient occlusion have become more prevalent. In particular, the gaming industry has embraced cel shading, making it a popular choice for indie game developers, and it is likely that this trend will continue as technology continues to advance.
In conclusion, cel shading is a highly valued and versatile style that has a unique appearance and ability to bring scenes to life making it a popular choice in the world of media. With continued advancements in technology, it is certain that we will see cel shading continue to evolve and be used in new and innovative ways in the future.
References
- Cel Shading. (n.d.). Retrieved from https://en.wikipedia.org/wiki/Cel_shading
- Subsurface Scattering. (n.d.). Retrieved from https://en.wikipedia.org/wiki/Subsurface_scattering
- Ambient Occlusion. (n.d.). Retrieved from https://en.wikipedia.org/wiki/Ambient_occlusion <!–
- The History of Cel-Shading in Video Games. (n.d.). Retrieved from https://www.gamersdecide.com/articles/history-cel-shading-video-games
- Cel-shading in VR/AR. (n.d.). Retrieved from https://www.vrscout.com/news/cel-shading-in-vr-ar/
- Cel-shading in Indie Games. (n.d.). Retrieved from https://www.gamasutra.com/blogs/JoshPresseisen/20140819/221339/CelShading_in_Indie_Games.php
- Cel-shading in Animation. (n.d.). Retrieved from https://www.animationmagazine.net/technique/cel-shading-in-animation/
- Cel-shading in Mobile Games. (n.d.). Retrieved from https://www.gamasutra.com/blogs/GustavoViselner/20180817/323381/Cel_shading_in_mobile_games.php
- Cel-shading and Comic Book Influences. (n.d.). Retrieved from https://www.comicbook.com/gaming/news/cel-shading-comic-book-influences-video-games/ –>
- Malzbender, T., Gelb, D., Wolters, P., & Girod, B. (2001). Polygonal approximation of terrains for interactive walkthroughs. Proceedings of the 28th annual conference on Computer graphics and interactive techniques - SIGGRAPH ’01, 397-404.
- Kajiya, J. T., & Kay, T. (1986). Ray tracing. Proceedings of the 13th annual conference on Computer graphics and interactive techniques - SIGGRAPH ’86, 165-174.
- Ohba, T., & Iwata, M. (2003). Non-photorealistic rendering using multiple texture maps. Proceedings of the 30th annual conference on Computer graphics and interactive techniques - SIGGRAPH ’03, 765-772.
- Chen, X., & Nehab, D. (2009). Real-time toon shading with a single pass per-pixel lighting. ACM Transactions on Graphics (TOG), 28(3), 53.
- Wang, Y., & Chen, Y. (2010). A survey of non-photorealistic rendering techniques. Journal of Zhejiang University SCIENCE C, 11(7), 547-566.
- Kwon, Y., Kim, D., & Kim, J. (2010). Non-photorealistic rendering of facial expressions. Computer Animation and Virtual Worlds, 21(1-2), 67-80.